
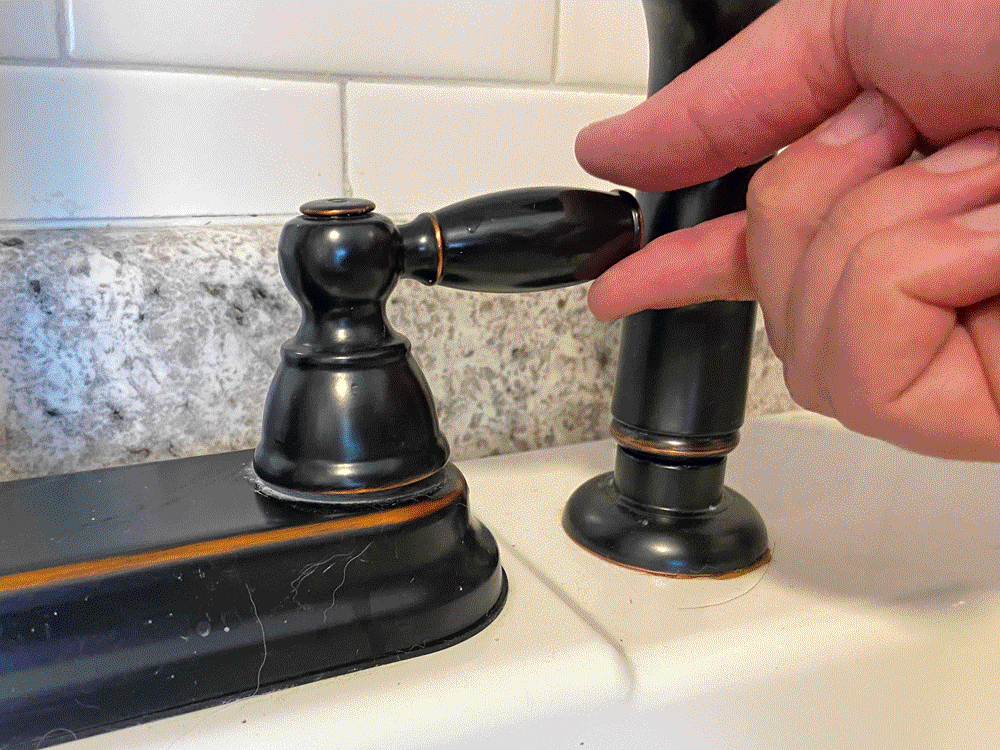
To remove a kitchen faucet handle without screws, pry off the cap and twist the handle counterclockwise. This often reveals a hidden fastener for removal.
Removing a kitchen faucet handle can appear daunting if the screws are not immediately visible, but the process is straightforward. Many faucet designs use a decorative cap to cover the fastener, ensuring a sleek look. By utilizing a flathead screwdriver or a similar prying tool, you can gently detach the cap to access the underlying mechanism.
Once the fastener is exposed, usually a cartridge or a retaining nut, gripping it with an adjustable wrench or pliers and turning it left (counterclockwise) will typically allow for the handle’s removal. Remember to shut off the water supply before attempting this task to prevent any accidents. This simple method will enable you to troubleshoot, clean, or replace your faucet components with ease.

Credit: www.homedit.com
Introduction To Faucet Handles
Faucet handles serve as the control point for water flow in your kitchen. They come in various styles and mechanisms. These range from traditional turning knobs to modern levers. Knowing how to remove a kitchen faucet handle, especially without screws, is essential. It can save you time and money on simple repairs or cleaning.
Identifying Common Faucet Handle Types
Different faucets feature different types of handles. There are ones with visible screws and others where the screws are hidden or absent. You may find:
- Single-lever handles – move up and down to adjust water pressure and left or right for temperature.
- Rotary knobs – turn clockwise or counterclockwise to start and stop water flow.
- Push-pull handles – require a push or pull to control the flow.
- Cross handles – have an ‘X’ shape for grip and turn to operate.
Signs That Your Faucet Handle Needs Removal
It’s time to remove your faucet handle when you notice:
- A leak around the handle area.
- Difficulty in turning the handle.
- A buildup of lime or mineral deposits.
A handle that sticks or squeaks also indicates that it might be time for removal or maintenance.
:max_bytes(150000):strip_icc()/repairing-a-single-handle-disk-faucet-1824878-hero-b3daee9af5174d8f9b9cb4a2582e7140.jpg)
Credit: www.thespruce.com
Tools And Materials Needed
Before diving into the task of removing a kitchen faucet handle without screws, gather the right tools and materials. This preparation ensures a smooth and efficient process. Let’s explore the items you’ll need to get started.
Essential Tools For The Job
Gather these basic tools:
- Allen wrench set – for loosening hidden fasteners
- Adjustable wrench – for turning components
- Flat-head screwdriver – for prying off caps
- Penetrating oil – eases disassembly
Additional Supplies For Unexpected Complications
You might need extra supplies:
- Plumber’s tape – seals threads
- Replacement O-rings – in case of damage
- Rubber mallet – helps with stuck parts
Step-by-step Removal Process
Embarking on a DIY kitchen project can be daunting. Yet, with the right guidance, removing a faucet handle without visible screws is straightforward. This step-by-step removal process unveils the mystery behind a screwless faucet handle.
Locating The Hidden Set Screw
Initially, find the hidden set screw. Search under the lever or behind the handle. A decorative cap or button often conceals it. Gently pry it off using a flat screwdriver. The hidden set screw typically requires an Allen wrench or a hex key for removal.
Techniques For Loosening The Handle
Next, loosen the tight faucet handle. If it feels stuck, apply penetrating oil around the base. Allow it to sit for a few minutes. Carefully wiggle the handle back and forth until it loosens. Use a strap wrench if necessary to avoid damaging the finish.
- Gather the right tools: an Allen wrench, a strap wrench, and penetrating oil.
- Inspect for a hidden set screw and remove any concealing cap.
- Insert the Allen wrench into the set screw and turn counterclockwise.
- If the handle does not come off, apply penetrating oil at the base.
- After a few minutes, attempt to wiggle the handle free patiently.
- Use a strap wrench for additional grip if the handle remains stuck.
With persistence and the proper technique, the faucet handle will come off, paving the way for maintenance or replacement.
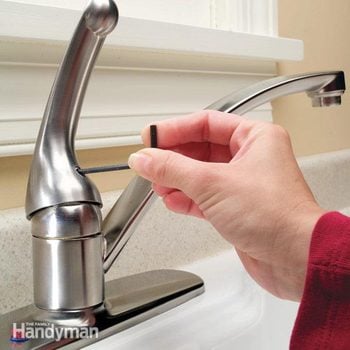
Credit: www.familyhandyman.com
Troubleshooting Common Issues
Occasionally, you may encounter a kitchen faucet handle that doesn’t seem to have screws. When regular methods don’t work, it’s time to troubleshoot. Here are some tips for when you can’t easily remove the faucet handle.
Dealing With A Stripped Set Screw
When set screws are stripped, removing the handle can be tough. Try these steps:
- Place a rubber band over the stripped screw to offer grip.
- Use a manual screwdriver; press down firmly and turn slowly.
- If that fails, try a screw extractor tool.
Seek professional help if these methods don’t work.
Solutions For A Stuck Faucet Handle
A stuck faucet handle can be annoying. Don’t force it.
- Clean around the handle; debris can cause sticking.
- Apply a penetrating oil spray; let it sit and then try again.
- Gently tap the handle with a hammer using a piece of wood to buffer.
If it remains stuck, consider consulting a plumber.
Finishing Up And Maintenance Tips
With the faucet handle off, it’s time to wrap things up. Proper reassembly and maintenance keep the faucet working smoothly. Let’s get those handles back on and talk about keeping them easy to remove in the future.
Reassembling The Faucet Handle
- Start by placing any removed caps or buttons back into position.
- If there was a hidden set screw, align the handle and tighten the screw gently with an Allen wrench.
- For slip-on handles, push the handle back onto the stem until it’s fully seated.
- Remember to align the handle for proper temperature and flow control.
- Turn on the water supply and check for any leaks around the handle area.
- Test the handle’s movement to ensure smooth operation.
Preventive Measures To Ease Future Removals
- Keep it clean: Regularly clean the handle and its base to prevent buildup.
- Lubricate moving parts: Apply a silicone-based lubricant to the set screw and stem.
- Inspect regularly: Check for mineral deposits and clean them off when you spot any.
- Gentle use: Avoid applying too much force when turning the faucet on or off.
- Stay manual: Use hand tools for tightening screws, not power tools.
Frequently Asked Questions On How To Remove Kitchen Faucet Handle Without Screws
Can A Kitchen Faucet Handle Be Removed Without Screws?
Yes, a kitchen faucet handle without visible screws can often be removed by locating and manipulating a concealed fastening mechanism.
What Tools Are Needed For Non-screw Faucet Handle Removal?
A flat-head screwdriver and an Allen wrench are common tools required to loosen and remove a hidden set screw in the faucet handle.
How To Identify A Hidden Faucet Handle Fastener?
Examine the faucet handle for a small cap or indentation; this often conceals an Allen-key set screw that secures the handle in place.
What Precautions Should Be Taken Before Removing A Faucet Handle?
Turn off the water supply to the faucet to prevent any accidental water discharge and protect the finish of the faucet handle with tape if using tools.
What’s The Procedure For A Stuck Faucet Handle?
Gently wiggle the handle side to side while pulling it away from the base to release a stuck faucet handle; use penetrating oil if necessary to loosen it.
Conclusion
Removing a kitchen faucet handle with no visible screws may seem daunting. With the right technique, it’s straightforward. You’ve learned to identify the faucet type, locate hidden fasteners, and employ alternative tools. Your faucet handle should now be free, without unwanted damage—ready for replacement or repair.
Tackling DIY plumbing is easier than ever.


Leave a Reply