
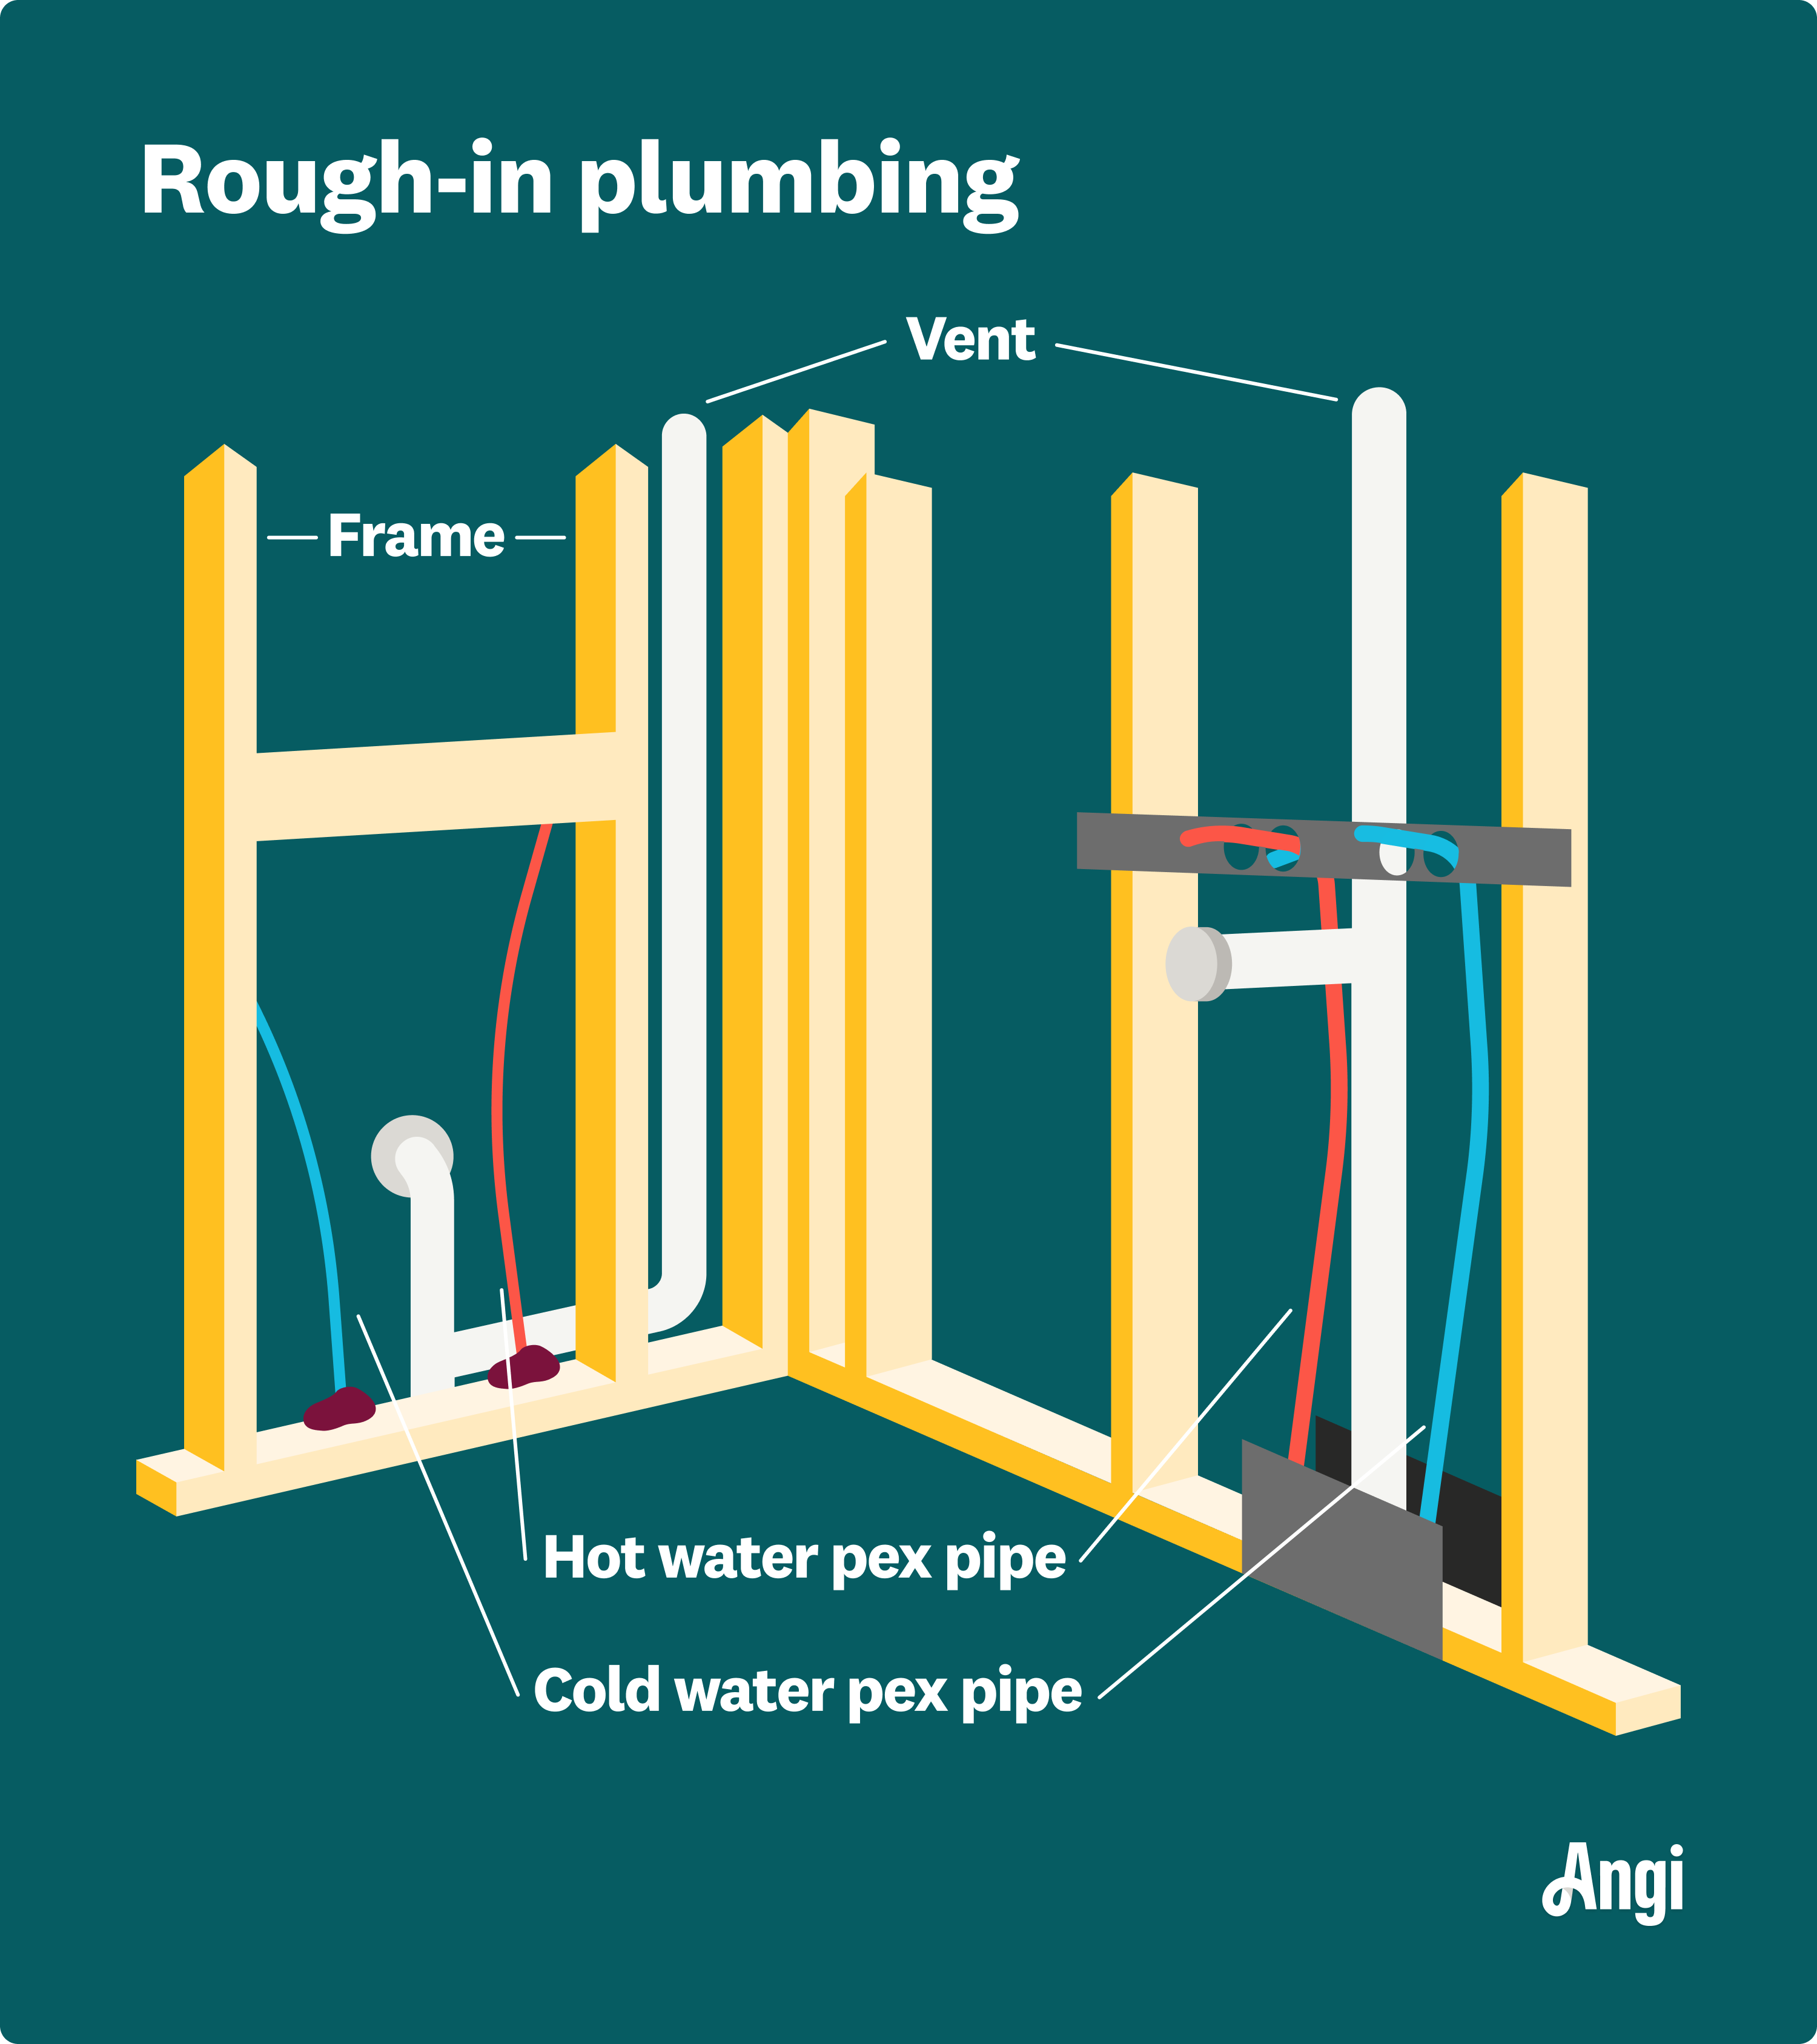
To rough in a double sink vanity, first mark the locations for the sink drains and supply lines. Ensure proper spacing for the two sinks, typically 30 inches apart.
Starting a home improvement project requires careful planning, especially when installing a new double sink vanity in your bathroom. It’s a task that can significantly enhance the functionality and aesthetics of the space. The rough-in process involves mapping out the plumbing configuration for two sinks to ensure everything will be properly connected once the vanity is in place.
This includes accurately positioning both drain and water supply lines to align with the sinks. A clear understanding of standard building codes and precise measurements are critical to avoid any costly mistakes. Proper tools and plumbing materials are essential for this DIY project or, if uncertain, hiring a professional plumber might be the best option.
Credit: www.finehomebuilding.com
Essential Tools And Materials
Preparing to install a double sink vanity requires the right set of tools and materials. Mastering this process ensures a smooth installation and functional bathroom setup. Get all essentials ready for an efficient rough-in process.
Inventory For The Job
Before starting, gather every item you’ll need. Having a complete inventory avoids delays. Here is a list of essential tools and materials.
- Tape measure: Ensures accurate measurements.
- Pipe cutter: For cutting pipes to the correct length.
- Wrench set: For tightening and adjusting connections.
- Plumber’s putty: Seals joints and prevents leaks.
- PVC or metal pipes: The skeleton for the plumbing.
- P-traps: Essential for preventing sewer gases.
- Shutoff valves: Controls water flow to each sink.
- Level: Ensures a perfectly horizontal fit.
- Hacksaw: Cuts through tougher materials.
- Screwdriver set: For miscellaneous tasks.
Choosing The Right Pipes
Select pipes that match your system’s requirements. Ensure durability and proper fit.
| Pipe Type | Use | Benefits |
|---|---|---|
| PVC | Drain, Waste, Vent | Lightweight, easy to work with |
| ABS | Drain, Waste, Vent | Sturdy, resists impact |
| Copper | Supply lines | Durable, resists corrosion |
| PEX | Supply lines | Flexible, easy to install |
In conclusion, reliability and compatibility with your vanity design are crucial when choosing pipes.
Credit: www.homedepot.com
Preparation Steps
Preparation Steps are crucial for a smooth installation of your double sink vanity. These steps set the stage for a successful rough-in process, ensuring everything aligns perfectly for your new feature.
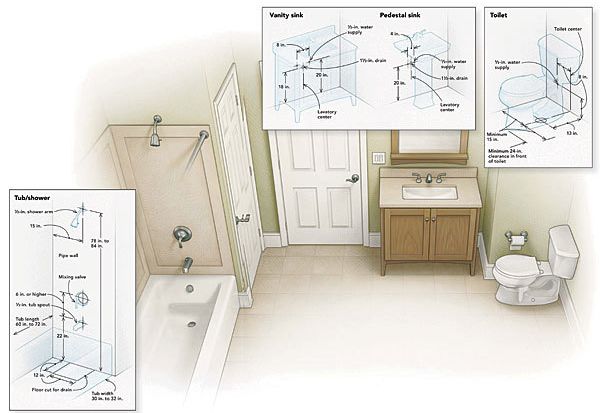
Measuring The Layout
Begin with a precise measurement of your space. Determine where you want your vanity to sit and mark the locations for plumbing. Remember, accuracy saves time and resources!
- Measure the available space width and depth
- Consider the vanity size to ensure a good fit
- Account for cabinet doors or drawers opening
- Mark the wall for plumbing lines and drain
Turning Off Water Supply
Before removing any fixtures, shut off the water supply. This step is vital for preventing water damage and ensuring your safety.
- Locate the shut-off valves under the sink
- Turn the valves clockwise to shut off the water
- Open the faucet to release any water and pressure inside the lines
Removing Old Fixtures
To make way for the new vanity, clear out the old sink and fixtures. Protect your space by carefully removing these pieces.
- Disconnect the water lines and p-trap under the sink
- Unscrew the sink from the countertop and lift it out
- Remove the vanity cabinet, being careful of plumbing lines
The Art Of Roughing-in Plumbing
Installing a double sink vanity involves precise plumbing work known as ‘roughing-in’. This step sets the groundwork for a smooth installation and function of your new vanity. Mastering the art of roughing-in plumbing ensures that water flows in and out of your double sinks effectively. It’s time to roll up your sleeves and dive into the nitty-gritty of this essential process!
Cutting And Fitting Pipes
The first step in roughing-in is cutting and fitting pipes for your double sink. Use a pipe cutter for a clean cut; this tool ensures a straight edge without burrs. Measure twice and cut once to avoid wasted materials.
- Mark the exact length on the pipes where cuts are needed.
- Secure the pipe cutter onto the pipe and rotate it around the pipe to score a line.
- Continue rotating and tightening the cutter until the pipe separates.
- After cutting, use a reamer or file to smooth out any rough edges.
With your pipes cut to the correct length, test fit everything before final installation. This step ensures that all components will align properly when you secure them permanently.
Securing The Drain Assembly
A crucial part of the installation is securing the drain assembly for each sink. Proper alignment and a tight seal are necessary to prevent leaks and ensure efficient drainage.
- Place the drain assembly into the sink drain hole.
- From below the sink, attach the gasket and washer.
- Hand-tighten the locknut to secure the assembly.
- Ensure there is no movement in the drain assembly.
- Apply plumber’s putty or silicone sealant for a watertight seal.
With the drain assembly in place, connect the tailpiece to the P-trap and then to the main drain pipe. Ensure that all connections are secure and tight to avoid future plumbing issues. Remember, a leak-free vanity starts with meticulous rough-in work.
Bonus tip: Always keep a bucket and towels handy for any unexpected water drips during the installation process.
Connecting The Double Sink
Once your double sink vanity is in place, it’s time to connect the sinks. This crucial step ensures that both sinks work properly and efficiently. You’ll be piecing together the plumbing, focusing on two key parts: the tees and wyes, and ensuring a water-tight seal. Let’s dive into each section without any fluff!
Installing The Tees And Wyes
Plumbing tees and wyes are essential for a double sink setup. They allow both sinks to connect to a single main drain. Here’s a step-by-step guide:
- Cut the PVC pipe to fit the distance between each sink’s drain and the main waste line.
- Place the wye fitting towards the main sewer line for efficient drainage.
- Attach a tee fitting beneath each sink tailpiece.
- Use PVC primer and cement to secure the connections.
- Ensure the tees’ outlets face each other and connect with a horizontal pipe.
Confirm the setup allows water to flow without restriction.
Crafting A Water-tight Seal
A water-tight seal stops leaks and keeps the vanity functioning well. Here’s how to achieve it:
- Apply plumber’s putty around the drain openings.
- Position the drain assemblies and tighten them down.
- For PVC connections, apply primer followed by PVC cement.
- Connect the sink traps to the tee fittings.
- Check all connections and adjust for a snug fit.
Do a leak test by filling both sinks and monitoring the connections. Make any necessary adjustments promptly to maintain a leak-free system.
Final Touches
After roughing in the plumbing for your double sink vanity, you’re ready for the final touches. This last phase transforms the functional framework into the polished centrepiece of your bathroom. Precision and patience here mean a leak-free setup and a stunning visual finish. Let’s dive into the critical steps to wrap up your installation.
Water Pressure Test
Testing water pressure is crucial before installing the vanity top. Follow these steps:
- Turn off the water supply.
- Remove any aerators from the faucets.
- Turn on both the hot and cold water valves.
- Watch for steady water flow.
- Check for leaks at all connections.
- Turn off the valves and dry the area.
A successful test ensures no surprises post-installation.
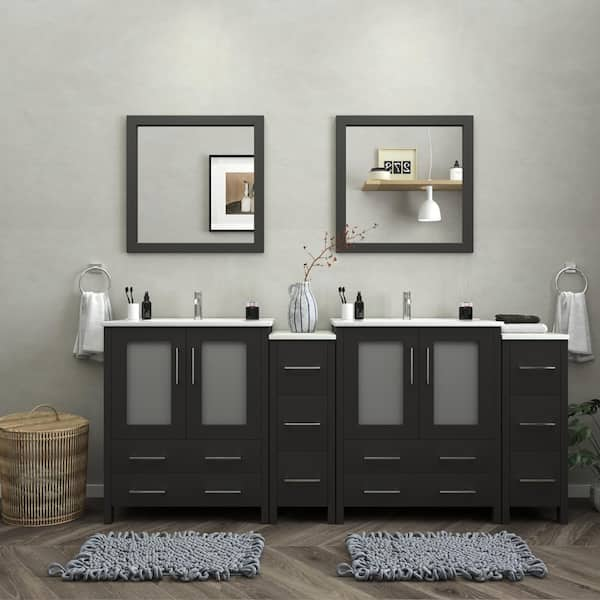
Installing The Vanity Top
Mounting the vanity top is the crowning step. Ensure you:
- Measure the vanity and the sink openings.
- Place the vanity top carefully in position.
- Align the sink openings over the drain holes.
- Adhere the top with silicone caulk.
- Secure and wipe any excess silicone.
Once secure, your double sink vanity should look seamless and be ready for use.
Credit: morenobath.com
Frequently Asked Questions Of How To Rough In A Double Sink Vanity
What Is Double Sink Vanity Rough-in?
A double sink vanity rough-in refers to the initial stage of installing plumbing for two sinks within a bathroom vanity, involving pipe placement, water supply, and waste drainage setups before the final connection.
How To Measure For Double Sink Installation?
For double sink installation, measure the vanity’s length, plan equal spacing for sinks, and ensure adequate clearance for drawers, doors, and plumbing within the cabinetry.
What Materials Are Needed For Rough Plumbing?
For rough plumbing, you’ll need PVC or ABS pipes, P-traps, shut-off valves, supply lines, T-fittings, sanitary tees, pipe hangers, and plumber’s tape.
Can One Drain Accommodate Two Sinks?
Yes, one drain can accommodate two sinks by using a tee fitting to combine the drain lines before connecting to the main waste line, adhering to local plumbing codes.
What’s The Standard Height For Sink Drains?
The standard height for sink drains is typically between 18 to 20 inches from the floor to the center of the drainpipe, allowing for proper clearance and connection to the sink’s tailpiece.
Conclusion
Wrapping up your double sink vanity project is a satisfying milestone. With the right tools and guidelines, you’ve tackled rough-in plumbing confidently. Remember to double-check connections and seal leaks for a flawless finish. The effort pays off with a functional, stylish addition to your bathroom sanctuary.
Ready for the next DIY challenge?


Leave a Reply