

To remove a bathtub faucet without a screw, locate the hidden mechanism or apply penetrating oil to loosen the fixture. Avoid forcing components to prevent damage.
Starting a bathroom renovation or simply need to replace a faulty bathtub faucet? Careful removal is key, especially when screws are not visibly holding the fixture in place. Sometimes, faucets are secured with hidden set screws or simply rely on threaded connections.
Understanding the faucet design is crucial for a successful removal. An easy-going approach combined with the right tools can save both time and potential damage to your bathroom fixtures. This guide will navigate through the straightforward steps to detach a bathtub faucet without a screw, ensuring your DIY plumbing task goes smoothly. Keep reading for a comprehensive walkthrough that simplifies your home maintenance project.
Preliminary Preparations
Ready to remove a bathtub faucet without a screw but unsure where to start? Proper preparation is the key to success. Follow these tips and you’ll have that faucet off in no time, without any unpleasant surprises.
Safety First: Shutting Off The Water Supply
Water damage is no joke. To avoid a mini flood, turn off the water supply. Find the main valve and turn it clockwise until it won’t budge. Confirm by testing your faucet; no water flow means you’re good to go.
Gathering Essential Tools For The Task
To remove a faucet, you need the right tools. They make the job easier and prevent damage.
- Adjustable wrench: to turn nuts and bolts.
- Slip-joint pliers: a versatile gripping tool.
- Allen wrench: to loosen hidden screws.
- Rag or cloth: to protect your fixtures.
- Penetrating oil: for stubborn connections.
- Flashlight: for good visibility.
Identifying Faucet Type
Starting a DIY bathtub faucet project begins with a crucial step: identifying the faucet type. Faucets come in various designs and may not have visible screws. Knowing the faucet design helps tailor the removal approach without causing any damage.
Recognizing Common Faucet Designs
Bathtub faucets usually fall into a few standard designs. Look for key features. These include single-handle, dual-handle, and those with a pull-out spray feature. Single-handle faucets typically merge hot and cold water through one lever. Dual-handle faucets have separate controls for hot and cold. Finally, some feature a pull-out spray nozzle for added convenience.
- Single-handle: Mix hot and cold water
- Dual-handle: Two controls for temperature
- Pull-out spray: Nozzle comes out for flexibility
Determining The Hidden Fastening Method
Faucets with no visible screws often hide their fastening method. Look for a cap on the top or front of the faucet. This might conceal a hidden screw. Another possibility is a set screw located under the faucet handle. Need to remove grip and check beneath.
- Inspect for a top or front cap on the faucet.
- Search for a set screw underneath the handle.
- Use a flashlight to spot hard-to-see fastening components.
Getting Down To Business
Ready to remove your bathtub faucet without a visible screw? Let’s dive in with strategies and tools you may need. Ensure your mains water is off before starting. Keep your workspace clear and tools on hand.
Strategies For Loosening The Faucet
First, look for any hidden screws or caps. Use a flat-blade screwdriver to gently pry caps off. No screws? No problem. Faucets often attach with corrosion or mineral deposits acting like glue.
- Check for any decorative caps that may hide screws.
- Apply gentle pressure to avoid breaking your faucet.
- Use a flashlight to inspect around the faucet handle for set screws.
Using Heat And Penetrating Oil To Your Advantage
Apply heat to expand the metal and break corrosion bonds. Use a hair dryer or heat gun on low setting. Keep it moving to avoid damage.
Penetrating oil can help too. Spray around the base. Give it time to work. Try to twist the faucet gently.
| Method | Tools | Procedure |
|---|---|---|
| Heat | Hair Dryer/Heat Gun | Apply heat evenly around faucet. |
| Oil | Penetrating Oil | Spray and wait several minutes. |
/how-to-replace-a-bathtub-faucet-5210836-10-6825223c1e75442187d5ab09690510d4.jpg)
Credit: www.thespruce.com
Dealing With Challenges
Removing a bathtub faucet that lacks visible screws can be tricky. Over time, faucets can become one with their surroundings, seemingly fusing with the bathtub due to corrosion and mineral deposits. With the right guidance though, with this process becoming an achievable task.
Managing Corrosion And Mineral Buildup
Cutting through the crawl of corrosion and calcification is your first hurdle. Don’t be discouraged if it looks daunting.
- Apply a penetrating oil to the affected areas.
- Let it soak for at least 15 minutes.
- Use a faucet puller, if necessary, to exert even pressure.
A vinegar soak can also dissolve stubborn deposits. Wrap a cloth soaked in vinegar around the faucet base and wait.
Alternative Methods If Standard Approaches Fail
When usual tactics won’t do, consider these plan B strategies:
- Heat application expands metal, sometimes breaking the corrosion bond. Use with caution.
- Tap gently around the faucet base. Vibrations may loosen it.
- Explore faucet-specific tools designed for such challenges.
Remember to protect your tub’s finish with cloth or a similar barrier while working.
Finishing Up
At this stage, you’ve unscrewed the elusive faucet. Congratulations on getting this far! Now it’s time to wrap things up with care to make sure your bathtub area stays in top-notch condition. Let’s dive into the final steps.
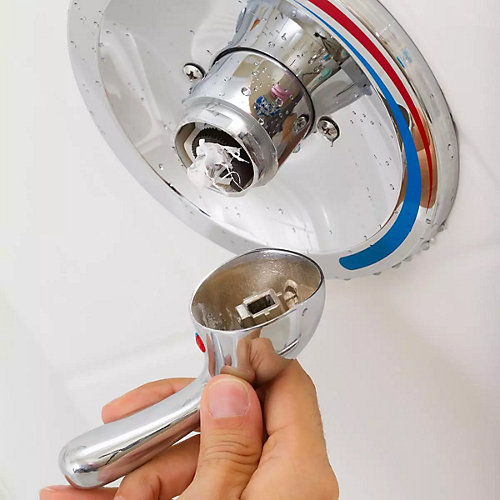
Ensuring A Damage-free Removal Process
Protect your bathtub from unwanted scratches or dents. Place a thick cloth or towel over the tub surface. When lifting the faucet, move slowly to prevent any accidental drops. Be mindful of sharp edges and use protective gloves to safeguard your hands.
Cleanup And Preparing For Replacement Or Repair
Once the faucet is out, inspect the area. Look for any residue or leftover sealant. Use a plastic putty knife to remove this gently. Avoid metal tools that could scratch the surface. Clean the area with mild soap and water, using a sponge or cloth. Dry the space completely. Now you’re ready to either install a new faucet or fix the current one. Have your tools and replacement parts on hand for a smooth process.
- Gather your tools: Ensure all necessary tools for installation or repair are within reach.
- Check for parts: Match new parts with the old ones to confirm you have the correct replacements.
- Seal properly: When installing a new faucet, apply sealant as directed to prevent leaks.
Credit: mrplumberindy.com

Credit: www.dumpsters.com
Frequently Asked Questions On Tips For Removing A Bathtub Faucet Without A Screw
Can I Remove A Bathtub Faucet Without Screws?
Yes, many faucets are designed with a hidden screw or utilize a set-screw system that can be manipulated with a special tool, typically an Allen wrench or a screwdriver.
What Tools Are Needed To Replace A Screwless Faucet?
To replace a screwless faucet, you generally need an Allen wrench, a pair of adjustable pliers, and plumber’s tape to ensure a tight seal.
Is It Possible To Strip A Faucet Handle?
Stripping a faucet handle can occur if excessive force is used without properly engaging the set-screw or if the handle is corroded and stuck.
How Do You Loosen A Stuck Faucet Handle?
To loosen a stuck faucet handle, apply a penetrating oil like WD-40, let it sit to break down mineral deposits, then gently wiggle the handle to free it.
What Are Common Mistakes In Removing Faucets?
Common mistakes include applying too much force without locating the hidden screw, not turning off the water supply, or damaging the finish with improper tools.
Conclusion
With these tips, removing a bathtub faucet without a screw has never been simpler. Embrace patience, follow the steps, and your DIY plumbing can be effortless and successful. Feel empowered to tackle future faucet issues, armed with your new knowledge and skills.
Remember, safety and proper tools are key. Happy unscrewing!


Leave a Reply